
WordPressは、主にインターネット上でブログを公開するために使用される無料のオープンソースコンテンツ管理システムです。 コーディング方法がわからない人のために設計されています。 WordPressを使用すると、Webサイトやブログの作成と保守が簡単になります。 その人気により、今日のWebサイトの3分の1以上がWordPressを利用しています。 これはPHPで記述されており、MariaDBとMySQLをデータベースバックエンドとして使用しています。
このチュートリアルでは、Ubuntu22.04にNginxと無料のLet’sEncryptSSL証明書を使用してWordPressをインストールする方法を紹介します。
前提条件
- Ubuntu22.04を実行しているサーバー。
- サーバーIPを指す有効なドメイン名。
- ルートパスワードはサーバーで構成されます。
Nginx、MariaDB、およびPHPをインストールします
開始する前に、LEMPサーバーをサーバーにインストールする必要があります。 インストールされていない場合は、次のコマンドを実行してインストールできます。
apt-get install nginx mariadb-server php php-fpm php-curl php-mysql php-gd php-mbstring php-xml php-imagick php-zip php-xmlrpc -y
LEMPサーバーをインストールしたら、次のコマンドを使用してPHPのバージョンを確認します。
php -v
次の出力でPHPバージョンを取得します。
PHP 8.1.2 (cli) (built: Apr  7 2022 17:46:26) (NTS)
Copyright (c) The PHP Group
Zend Engine v4.1.2, Copyright (c) Zend Technologies
    with Zend OPcache v8.1.2, Copyright (c), by Zend Technologies
次に、PHP構成ファイルを編集し、いくつかのデフォルト設定を微調整します。
nano /etc/php/8.1/fpm/php.ini
次の行を変更します。
cgi.fix_pathinfo=0
upload_max_filesize = 128M
post_max_size = 128M
memory_limit = 512M
max_execution_time = 120
終了したら、ファイルを保存して閉じます。
WordPress用のデータベースを作成する
WordPressはデータベースを使用してコンテンツを保存します。 したがって、WordPress用のデータベースとユーザーを作成する必要があります。
まず、次のコマンドを使用してMariaDBシェルにログインします。
mysql
ログインしたら、次のコマンドを使用してデータベースとユーザーを作成します。
MariaDB [(none)]> CREATE DATABASE wpdb;
MariaDB [(none)]> CREATE USER 'wpuser'@'localhost' IDENTIFIED BY 'securepasssword';
次に、次のコマンドを使用して、WordPressデータベースにすべての権限を付与します。
MariaDB [(none)]> GRANT ALL ON wpdb.* TO 'wpuser'@'localhost';
次に、特権をフラッシュし、次のコマンドでMariaDBを終了します。
MariaDB [(none)]> FLUSH PRIVILEGES;
MariaDB [(none)]> EXIT;
終了したら、次のステップに進むことができます。
Ubuntu22.04にWordPressをインストールする
まず、Nginx Webルートディレクトリに移動し、次のコマンドを使用して最新バージョンのWordPressをダウンロードします。
cd /var/www/html
wget https://wordpress.org/latest.tar.gz
WordPressがダウンロードされたら、次のコマンドを使用してダウンロードしたファイルを抽出します。
tar -zxvf latest.tar.gz
次に、WordPressサンプル構成ファイルの名前を変更します。
mv /var/www/html/wordpress/wp-config-sample.php /var/www/html/wordpress/wp-config.php
次に、WordPress構成ファイルを編集し、データベース設定を定義します。
nano /var/www/html/wordpress/wp-config.php
以下に示すようにデータベース設定を定義します。
define( 'DB_NAME', 'wpdb' );

/** Database username */
define( 'DB_USER', 'wpuser' );

/** Database password */
define( 'DB_PASSWORD', 'securepasssword' );

/** Database hostname */
define( 'DB_HOST', 'localhost' );
セキュリティ上の理由から、wp-configファイルのセキュリティキーも更新する必要があります。 まず、行きます ここ それらを生成します。 次に、以下のように追加します。
define('AUTH_KEY',         'Y$I,-gafVeR>Z-8qy&jQ62L}{R)e|lK/#RBh.Y#f+p-P*.8,,hP-iX[q3*tVP-fu');
define('SECURE_AUTH_KEY',  'D)k6o`D G%<()-zXP5{T{v2)Zgo-c+8T-Un=+R3%n/X2=MLDb5$O]UHA%gK| .WR');
define('LOGGED_IN_KEY',    'eL|5#`ul|;MrKm#q$KVl/ky(i}Jc;xrH(Eb|Hwzb/?-.RLSUSX2X[4HD:U:UOP:Y');
define('NONCE_KEY',        ']azQ+9f^#~l*r>uPMH5H>ck:?az4o[)*Txo:+MGjE5f&0kag3O9m85g3~VJ6YVWE');
define('AUTH_SALT',        'fAM5&`m4X+{+wSsF.!}-/[email protected]~~u%>}la1bCC,@#+R*t]uYf?[hph/>!Bw>v#oaQ');
define('SECURE_AUTH_SALT', '}|Z&dj_tFV2T$7y(O#O|bwwQ$sH6t!-zdE.MlOHLZ>4WDqG:_Qzn#Allm-UO1#7P');
define('LOGGED_IN_SALT',   'b9Uf~**[email protected]{KWknsAL^9D7Ix3CO.+PpFF~btd)-pG~pXPQ,[c&WRE-NgLG9~)|');
define('NONCE_SALT',       '}mTUi&.#i+YJT-TSrbIwqWO<]ut3K%CS~7g.} *NztVlgZDr`?>wxJ+_VW-D_zif');
終了したら、ファイルを保存して閉じます。 次に、WordPressディレクトリに適切な権限と所有権を設定します。
chown -R www-data:www-data /var/www/html/wordpress
chmod -R 755 /var/www/html/wordpress
WordPress用のNginx仮想ホストを作成する
次に、インターネット経由でWordPressを提供するために、Nginx仮想ホスト構成ファイルを作成する必要があります。
nano /etc/nginx/conf.d/wordpress.conf
次の構成を追加します。
server {
    listen 80;
    root /var/www/html/wordpress;
    index  index.php index.html index.htm;
    server_name  wordpress.example.com;

    client_max_body_size 500M;

    location / {
        try_files $uri $uri/ /index.php?$args;
    }

    location = /favicon.ico {
        log_not_found off;
        access_log off;
    }

    location ~* .(js|css|png|jpg|jpeg|gif|ico)$ {
        expires max;
        log_not_found off;
    }

    location = /robots.txt {
        allow all;
        log_not_found off;
        access_log off;
    }

    location ~ .php$ {
         include snippets/fastcgi-php.conf;
         fastcgi_pass unix:/var/run/php/php8.1-fpm.sock;
         fastcgi_param SCRIPT_FILENAME $document_root$fastcgi_script_name;
         include fastcgi_params;
    }
}
ファイルを保存して閉じ、次のコマンドを使用してNginx構成を確認します。
nginx -t
次の出力が得られます。
nginx: the configuration file /etc/nginx/nginx.conf syntax is ok
nginx: configuration file /etc/nginx/nginx.conf test is successful
次に、NginxおよびPHP-FPMサービスを再起動して、変更を適用します。
systemctl restart nginx
systemctl restart php8.1-fpm
次のコマンドを使用して、Nginxのステータスを確認することもできます。
systemctl status nginx
次の出力が得られます。
? nginx.service - A high performance web server and a reverse proxy server
     Loaded: loaded (/lib/systemd/system/nginx.service; enabled; vendor preset: enabled)
     Active: active (running) since Thu 2022-05-05 11:36:28 UTC; 10s ago
       Docs: man:nginx(8)
    Process: 16880 ExecStartPre=/usr/sbin/nginx -t -q -g daemon on; master_process on; (code=exited, status=0/SUCCESS)
    Process: 16882 ExecStart=/usr/sbin/nginx -g daemon on; master_process on; (code=exited, status=0/SUCCESS)
   Main PID: 16883 (nginx)
      Tasks: 3 (limit: 4630)
     Memory: 3.4M
        CPU: 49ms
     CGroup: /system.slice/nginx.service
             ??16883 "nginx: master process /usr/sbin/nginx -g daemon on; master_process on;"
             ??16884 "nginx: worker process" "" "" "" "" "" "" "" "" "" "" "" "" "" "" "" "" "" "" "" "" "" "" "" "" "" "" ""
             ??16885 "nginx: worker process" "" "" "" "" "" "" "" "" "" "" "" "" "" "" "" "" "" "" "" "" "" "" "" "" "" "" ""

May 05 11:36:28 ubuntu2204 systemd[1]: Starting A high performance web server and a reverse proxy server...
May 05 11:36:28 ubuntu2204 systemd[1]: Started A high performance web server and a reverse proxy server.
完全なWordPressWebインストール
次に、Webブラウザーを開き、URLを使用してWordPressインストールウィザードにアクセスします。 http://wordpress.example.com。 次のページにリダイレクトされます。
言語を選択して、 継続する ボタン。 WordPressサイトの設定ページが表示されます。
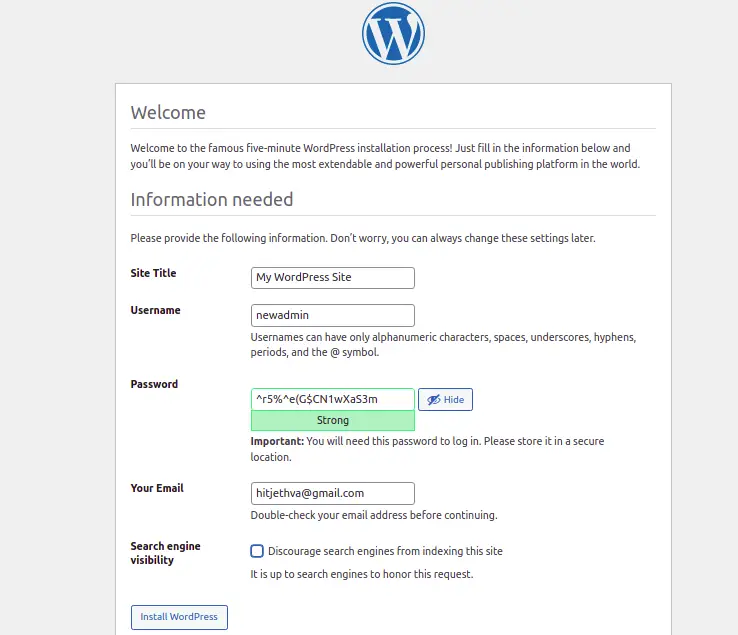
Webサイト名、管理者ユーザー名、パスワード、電子メールを入力し、をクリックします。 インストール WordPress ボタン。 WordPressをインストールすると、次のページが表示されます。
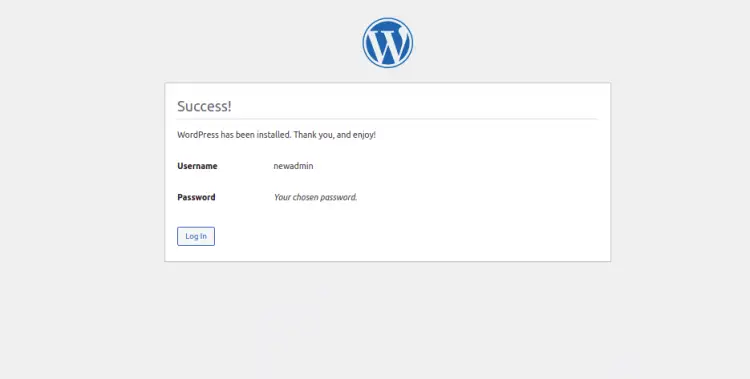
クリックしてください ログイン ボタン。 WordPressのログインページが表示されます。
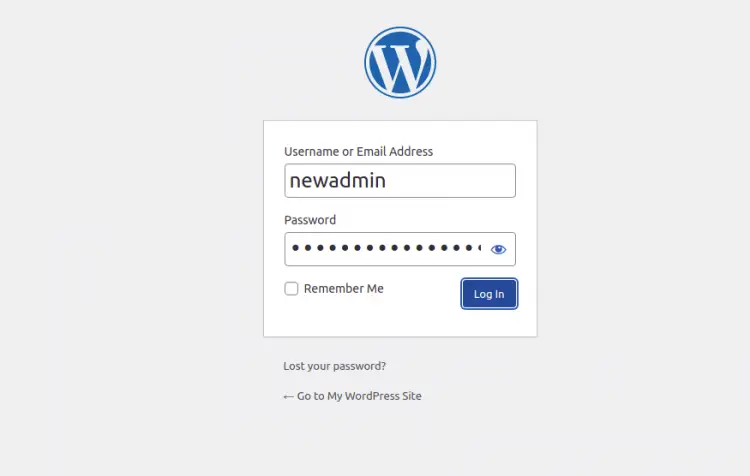
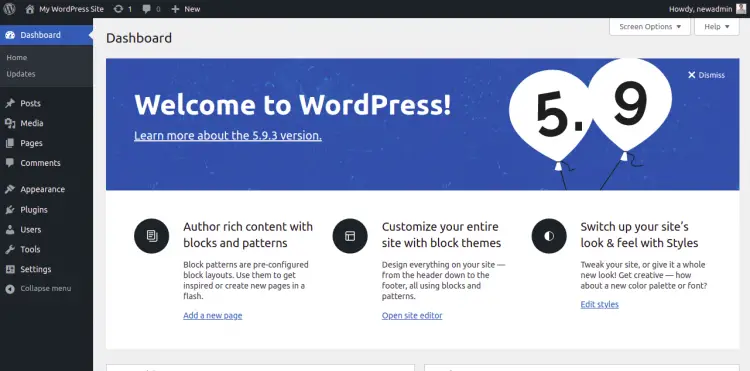
管理者のユーザー名とパスワードを入力し、をクリックします ログイン ボタン。 次のページにWordPressダッシュボードが表示されます。
WordPressでHTTPSを有効にする
サイトでHTTPSを有効にするには、CertbotLet’sEncryptクライアントをシステムにインストールする必要があります。 次のコマンドを実行してインストールできます。
apt-get install python3-certbot-nginx -y
Certbotクライアントがインストールされたら、次のコマンドを実行してWebサイトでHTTPSを有効にします。
certbot --nginx -d wordpress.example.com
以下に示すように、有効なメールアドレスを入力し、利用規約に同意するよう求められます。
Saving debug log to /var/log/letsencrypt/letsencrypt.log
Plugins selected: Authenticator nginx, Installer nginx
Enter email address (used for urgent renewal and security notices) (Enter 'c' to
cancel): [email protected]

- - - - - - - - - - - - - - - - - - - - - - - - - - - - - - - - - - - - - - - -
Please read the Terms of Service at
https://letsencrypt.org/documents/LE-SA-v1.2-November-15-2017.pdf. You must
agree in order to register with the ACME server at
https://acme-v02.api.letsencrypt.org/directory
- - - - - - - - - - - - - - - - - - - - - - - - - - - - - - - - - - - - - - - -
(A)gree/(C)ancel: A

- - - - - - - - - - - - - - - - - - - - - - - - - - - - - - - - - - - - - - - -
Would you be willing to share your email address with the Electronic Frontier
Foundation, a founding partner of the Let's Encrypt project and the non-profit
organization that develops Certbot? We'd like to send you email about our work
encrypting the web, EFF news, campaigns, and ways to support digital freedom.
- - - - - - - - - - - - - - - - - - - - - - - - - - - - - - - - - - - - - - - -
(Y)es/(N)o: Y
Obtaining a new certificate
Performing the following challenges:
http-01 challenge for wordpress.example.com
Waiting for verification...
Cleaning up challenges
Deploying Certificate to VirtualHost /etc/nginx/conf.d/wordpress.conf
次に、以下に示すように、HTTPトラフィックをHTTPSにリダイレクトするかどうかを選択します。
- - - - - - - - - - - - - - - - - - - - - - - - - - - - - - - - - - - - - - - -
1: No redirect - Make no further changes to the webserver configuration.
2: Redirect - Make all requests redirect to secure HTTPS access. Choose this for
new sites, or if you're confident your site works on HTTPS. You can undo this
change by editing your web server's configuration.
- - - - - - - - - - - - - - - - - - - - - - - - - - - - - - - - - - - - - - - -
Select the appropriate number [1-2] then [enter] (press 'c' to cancel): 2
2と入力し、Enterキーを押してインストールを終了します。 次の出力が表示されます。
Redirecting all traffic on port 80 to ssl in /etc/nginx/conf.d/wordpress.conf

- - - - - - - - - - - - - - - - - - - - - - - - - - - - - - - - - - - - - - - -
Congratulations! You have successfully enabled https://wordpress.example.com

You should test your configuration at:
https://www.ssllabs.com/ssltest/analyze.html?d=wordpress.example.com
- - - - - - - - - - - - - - - - - - - - - - - - - - - - - - - - - - - - - - - -

IMPORTANT NOTES:
 - Congratulations! Your certificate and chain have been saved at:
   /etc/letsencrypt/live/wordpress.example.com/fullchain.pem
   Your key file has been saved at:
   /etc/letsencrypt/live/wordpress.example.com/privkey.pem
   Your cert will expire on 2023-02-08. To obtain a new or tweaked
   version of this certificate in the future, simply run certbot again
   with the "certonly" option. To non-interactively renew *all* of
   your certificates, run "certbot renew"
 - Your account credentials have been saved in your Certbot
   configuration directory at /etc/letsencrypt. You should make a
   secure backup of this folder now. This configuration directory will
   also contain certificates and private keys obtained by Certbot so
   making regular backups of this folder is ideal.
 - If you like Certbot, please consider supporting our work by:

   Donating to ISRG / Let's Encrypt:   https://letsencrypt.org/donate
   Donating to EFF:                    https://eff.org/donate-le

 - We were unable to subscribe you the EFF mailing list because your
   e-mail address appears to be invalid. You can try again later by
   visiting https://act.eff.org.
結論
おめでとう! これで、Ubuntu22.04にNginxとLet’sEncryptSSLを使用してWordPressが正常にインストールされました。 これで、好みのテーマとプラグインをインストールして、独自のWebサイトの構築を開始できます。
The post Nginxを使用してWordPressをインストールし、Ubuntu22.04でSSLを暗号化する方法 appeared first on Gamingsym Japan.