With the release of the iPhone 13, Apple smartphone cameras have Photographic styles. The new feature sounds serious, but it’s not entirely clear what it is. In fact, users got the opportunity to improve their photos through smart filters controlled by a neural network. Apple’s algorithms edit the image on the fly, selecting the optimal color and contrast and keeping people’s faces natural.
BY TOPIC: Max Asabin is a real “god of Photoshop”.
What’s the difference between Photo Styles and Filters in the iPhone Camera?
Regular filters work on an entire photo, affecting the entire image. Photographic styles are an important step forward. They are smart enough to correctly correct different parts of the photo. With this function, you will be fairly sure that all elements of the picture, such as skin tones, will receive the optimal color and tone.
Unlike filters, photographic styles are applied individually to each area of the photo without changing people’s skin tones.
BY TOPIC: How to view photos and videos taken on iPhone or iPad on a map.
What are Photographic Styles?
It’s no secret that today the quality of an image is largely formed not by optics, but by processing algorithms. And Apple is one of the leaders in this direction. If you turn off the software effect, then the faces in the pictures will become darker, the sky will be faded, and the colors will be dull.
Photo Styles are four new presets that you can use on iPhone 13 and newer. You can apply styles to a photo before taking it. Through the Camera application, possible edits can be seen in real time in order to immediately present the final result. Styles are best described as intelligent (smart, smart) filters, each version of which highlights certain parts of the photo. You can choose from five presets: Standard, Colorful, Rich Contrast, Warm, and Cool.
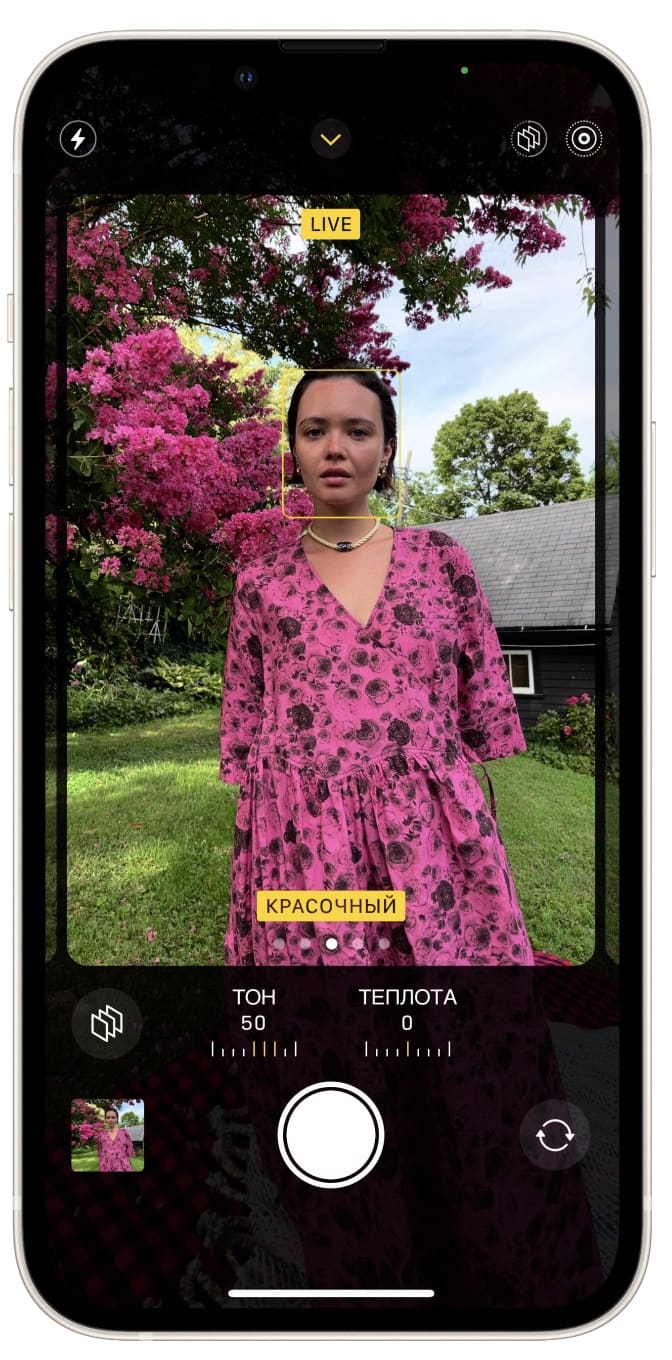
- Standard. The picture that is displayed by default on the iPhone screen is required to be quite realistic and balanced.
- Colorful provides brighter and more saturated colors, but the picture should still appear natural. The style is well suited for shooting in the city, with bright skies and dark buildings.
- Saturated creates a more dramatic look with enhanced shadows, deeper colors and increased contrast. This style works well for indoor shooting. The background becomes darker, less visible, and the colors in the foreground are enhanced.
- Warm adds golden hues to the image, making it warmer. The style is suitable for autumn shooting or golden hour simulation.
- Chill adds a blue tint for a cooler look. This style is best used for a light environment in order to best convey a feeling of cleanliness and some kind of detachment. It is well suited for night photography with weak light sources, for twilight and fog.
Each of them can also be adjusted to suit your vision of the image, as well as mixed using the Tone and Warmth sliders. In this case, the name of the preset will change to the phrase: rich warm, colorful cool, etc.
Styles can be used with all camera lenses, not only the main camera, but also the front TrueDepth camera.
BY TOPIC: What is the “golden hour” when taking a photo, or what time of day is best to take pictures on the street.
How do Photo Styles work on iPhone?
Photographic styles are best thought of as a spot filter, but this approach has its own quirks. The filter is applied during shooting both to the entire photo and to its individual parts; after taking the picture, it will no longer be possible to change it.
Apple Photo Styles are really smart, the effect of applying to different parts of a photo can be seen live. This way, you will be sure that every element of the photo, including skin tones, will turn out as intended as possible.
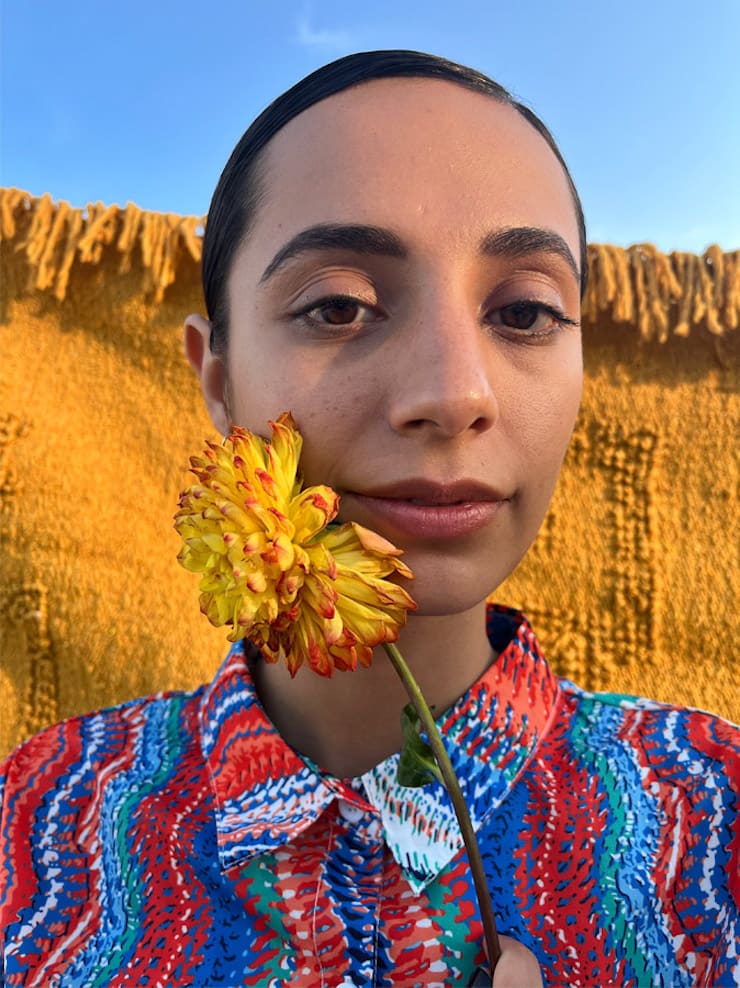
In addition, photographic styles are designed to suit your individual preferences for the shot. If you like bright colors, then you’d better choose the appropriate style before you start shooting. After that, you no longer have to adjust the photo or use a filter – new pictures will be created taking into account the applied preset.
This approach will allow you to form the best optimal photos without the use of post-editing. Some elements will play in a new way.

To make sure every element in the frame looks its best, your iPhone will create several masks based on different lighting conditions, people’s positions, skin color matching, and surroundings. Then the smartphone will select the balance of white and chiaroscuro, at the output the photo will be very quickly painted due to similar frames taken as a basis. This is how Smart HDR technology works. Photographic styles use the same principle, but the frame artificially complements others with light and color, slightly changing reality. In Smart HDR, the mask makes objects stand out from the rest, and in the photographic style, it protects against additional correction.
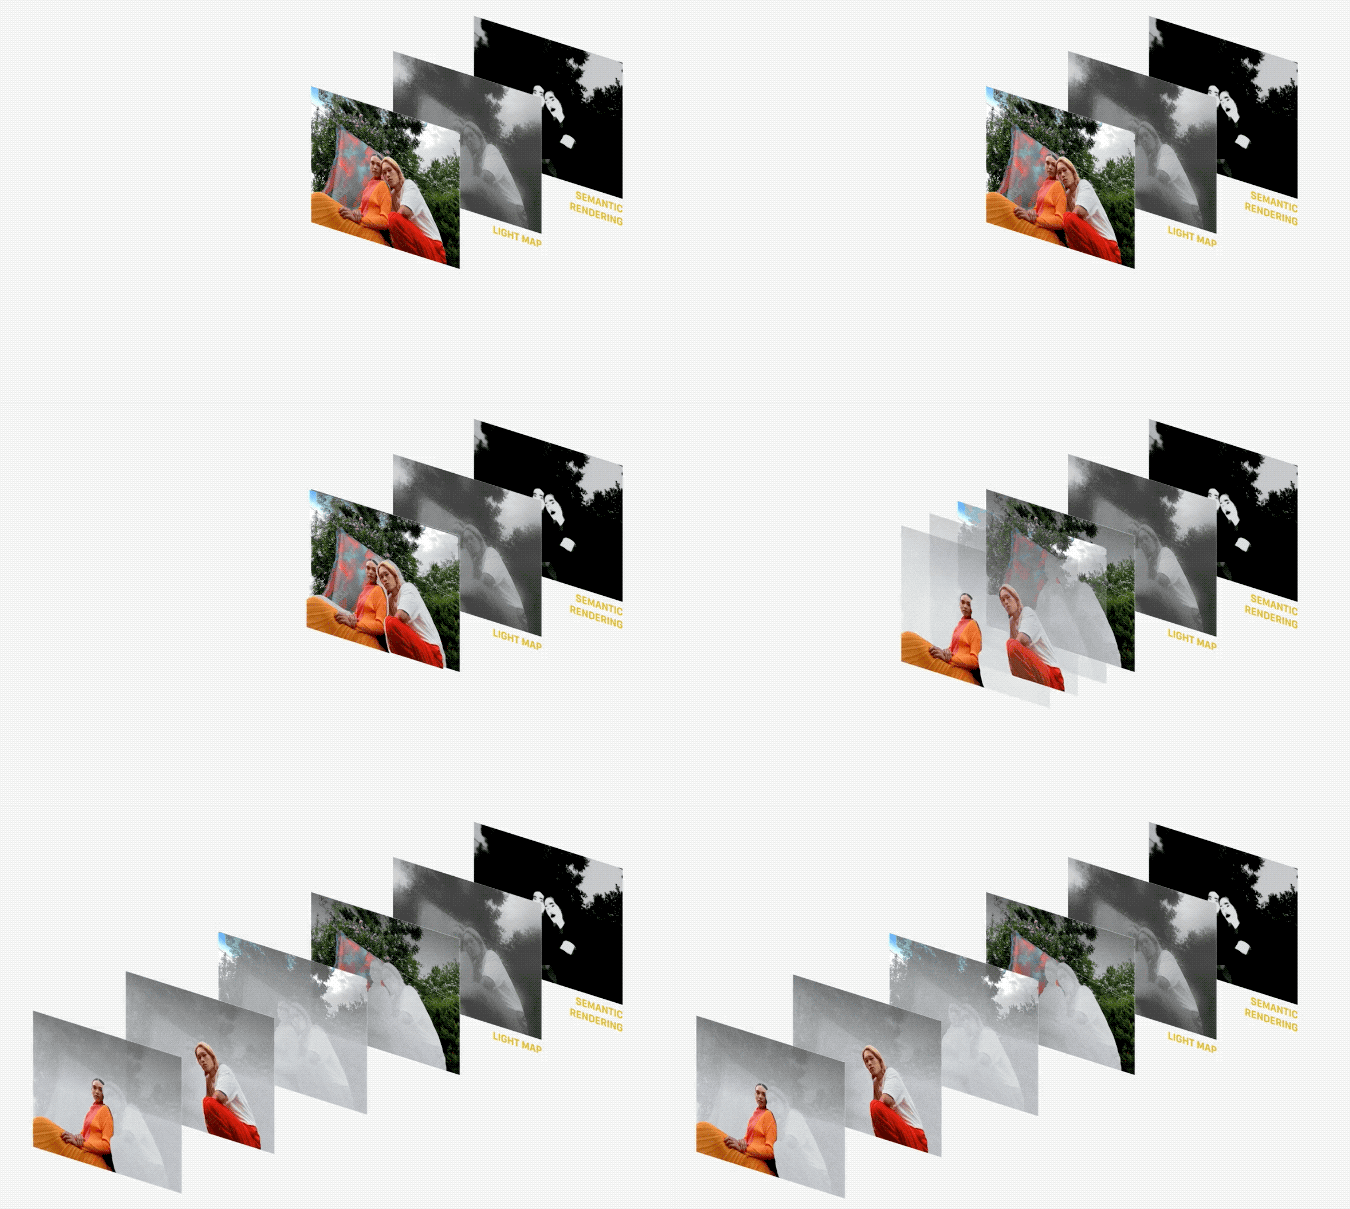
Ordinary styles can be compared to colored glass through which you look at reality – it all acquires a certain color. But photographic styles are a kind of cutout in colored glass, which can also be changed in shape, coloring the necessary elements to suit your needs. Previously, photographers had to use masks in Photoshop to do this, separating the skin tone from the background color. The iPhone, on the other hand, does everything in automatic mode, which requires from 3 to 9 frames. Valuable fragments are selected from them, several layers are created, and then the smartphone evaluates the illumination, removes noise and creates an illumination map. That is why already finished photos cannot be changed.
BY TOPIC: How to find out the GPS coordinates of a photo (the place where it was taken) on the iPhone.
How to Enable Photo Styles on iPhone
Photo Styles must be applied before the photo is taken, which is the purpose of this feature. To do this, follow these steps.
1. Open the Camera app.
2. Swipe up on the screen or tap the arrow at the top.
3. Above the capture button, you will see icons for more options.
4. Touch the icon with three squares superimposed on each other.
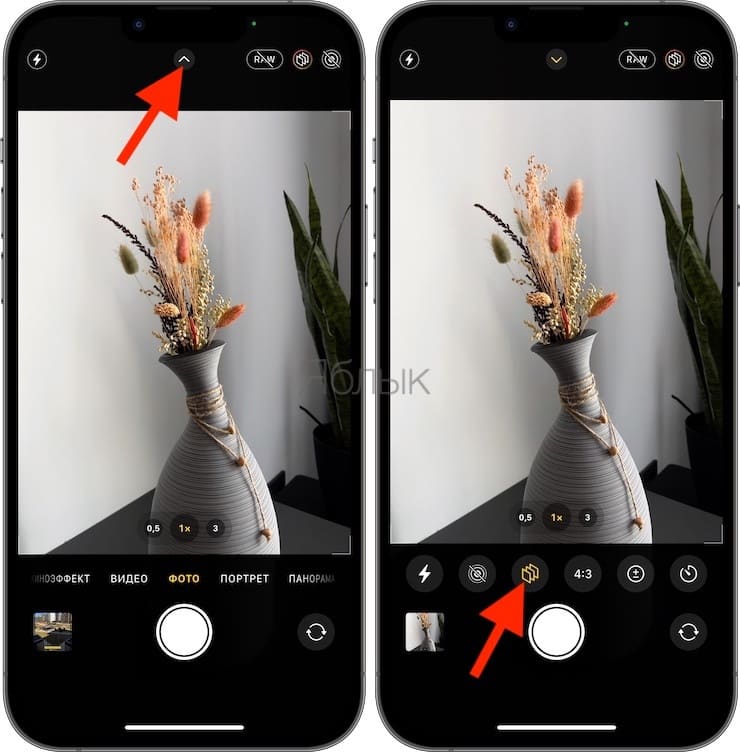
5. Swipe left or right to switch between styles.
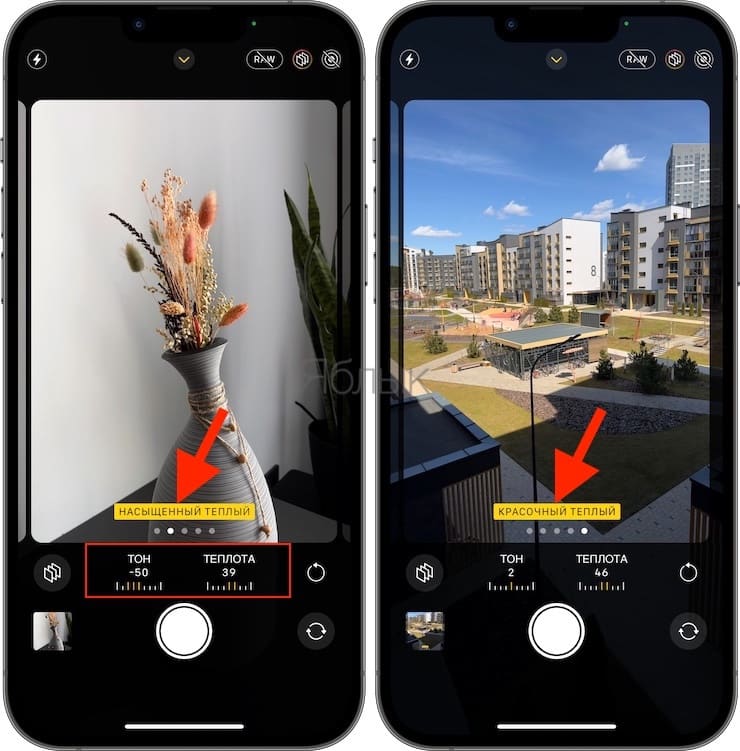
6. Adjust Hue and Warmth as needed.
7. Now just press the capture button to take a picture
When you select a style, you will immediately see on the screen how the picture changes. When you take a photo, the filter will be applied to the image in the same way.
As mentioned, you’ll also see tone and warmth sliders under each of the presets for the best personalization of style. All these settings will be saved for the next launch of the Camera application and use of photographic styles until you change them or reset them (the button on the right with the arrow looped in the ring will help).
BY TOPIC: 30 most famous fake photos that you could believe.
Experiment with photographic styles!
The Hue and Warmth sliders in the photographic style settings can change their values from -100 to 100, and the name of the filter itself will also change! In fact, you will get a few more effects. By adding tone and warmth, you can convey a bright and soft mood, and by moving the sliders in the opposite direction, you can make the scene more harsh and brutal.
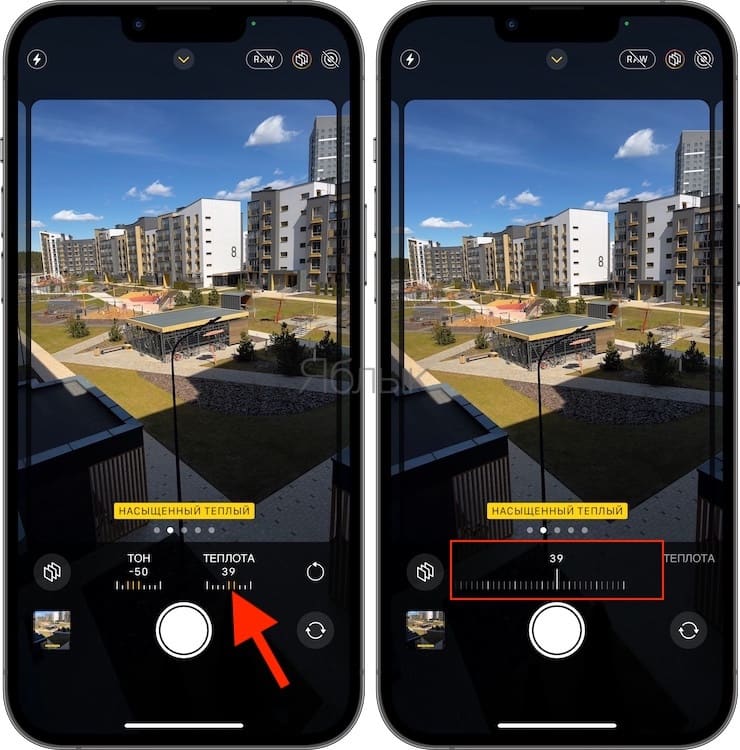
Depending on the time of year and the setting, styles and combinations can look new. This is a very interesting and versatile tool that deserves to be practiced with so that in the future it will be clear which preset is needed in a particular situation.
See also:
.
The post Photo styles on iPhone: what are they for and how to use them? appeared first on Gamingsym.
